
The pictures show a Vancouver subscription with CN and CPKC from Calgary and Edmonton; yours will show your own ports, railroads and ramps.
Open the Rail Edition tab
Sign in at elane.tradelanes.co with your usual email and password, then click Rail Edition in the menu bar at the top.

Check you are looking at your lanes
Under the title, the page lists your railroads and origin ramps. On the right, Rail Legs counts the rail legs on the page and Flagged counts the ones that need a check with the carrier.

- Port - choose the port of loading you want to see.
- Search - leave it empty to start. Anything typed here hides every row that does not match it.
- Departure window - choose All dates to see everything, or a shorter window to focus.
If the page shows "No rows" or 0 rail legs: clear the search box, then check your port is selected in the Port box. If it is still empty, email customer.support@tradelanes.co with a screenshot.
Narrow it to what you act on
- Inland ramp - pick one ramp or several.
- Departure window - pick how far ahead to look, for example the cargo window 7 to 21 days out.
- Flagged Only - shows only the rail legs to confirm with the carrier. Click it again to see all of them.
- Search - type a vessel name to find one sailing.
Reading a rail leg
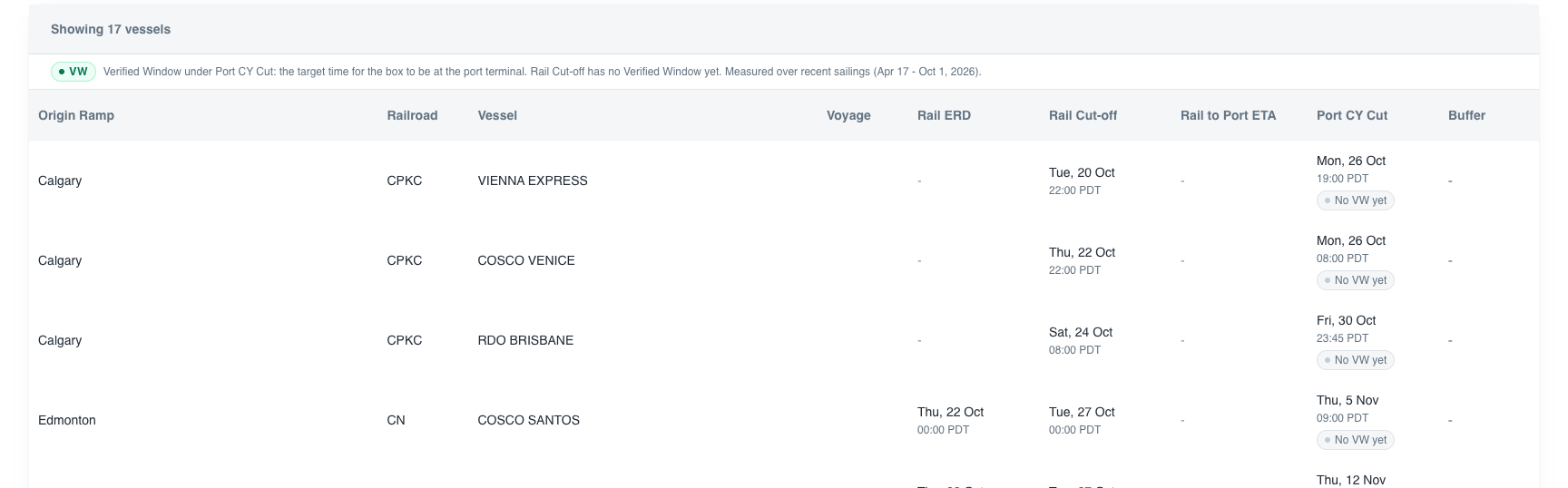
- Origin Ramp and Railroad - where the container goes onto the train, and on which railroad.
- Vessel and Voyage - the sailing the container connects to.
- Rail ERD - the first day the ramp receives containers for that sailing.
- Rail Cut-off - the last day and time the railroad takes the container.
- Rail to Port ETA - when the container is expected at the port terminal by rail.
- Port CY Cut - the last time the container can be at the port terminal for the vessel.
- Buffer - the time between the expected rail arrival and the Port CY Cut, when both are published.
A dash (-) means that date is not published yet. The badge under the Port CY Cut is its Verified Window status - see How to Use Verified Windows.
Save the view you will use every day
Set the Port, Inland ramp and Departure window the way you like them, click Save As and give the view a name, for example "Vancouver - next 3 weeks". Next time, click Saved Filters and choose it. See Filters and Saved Views for more.
Check your lanes in Settings
Go to Settings -> Rail Subscriptions. Each line is one port with its railroads and inland origins; the tab shows exactly what is selected here.

To add or remove a railroad or a ramp, click the pencil on that line. The delivery time is in the port's local time.
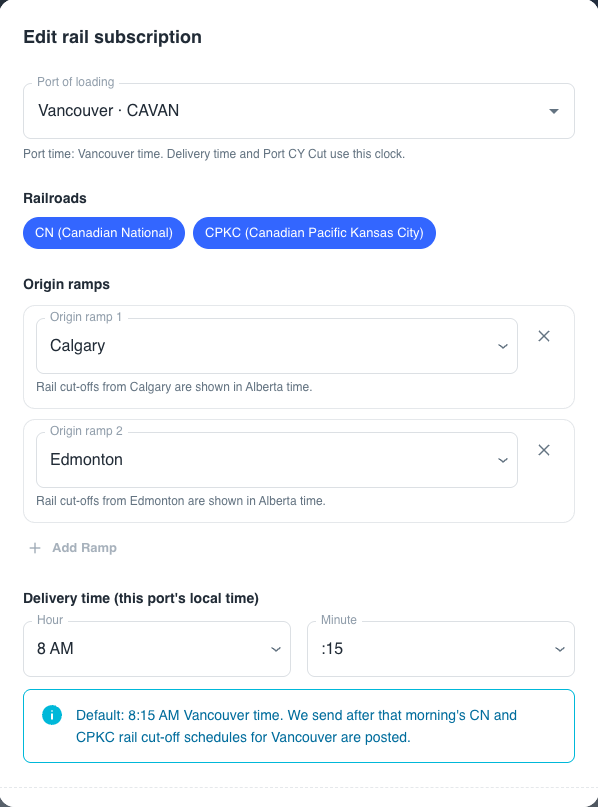
To add a new port or lane, see VSR by Terminal - Rail Edition.
Quick-start checklist
- Open Rail Edition and confirm your railroads and ramps are listed under the title.
- Choose your port and clear the search box.
- Narrow to your ramps and departure window, and try Flagged Only.
- Save the view with Save As.
- Check your lanes in Settings -> Rail Subscriptions.
Your Rail Edition tab now opens on the rail legs you act on.